Wednesday, 26 August 2020

Prawns Biryani - Who can resist?


Lovers of seafood will never leave any chance to devour this delectable dish.. Prawns and Biryani are 2 words which make us drool over and over....Prawns are something which are very difficult to cook... Reason being if you cook for lesser time, you will have that raw smell / taste and undercook.. If you overcook it, you will end up with a rubbery prawn which I am sure you definitely don't want.

Tips and timings in this regard always help.. Don't miss them in the following post..


Here goes Prawns Biryani Recipe

To Serve 3-4 people depending on an average appetite :)
Prawns -25-30 Prawns medium sized

Marination

add 1 tsp salt, 1 .5 tsp Chilli Powder 1.5 tsp GingerGarlic Paste 1 tsp Coriander Powder 1 tsp Cumin Powder
Mix all of them thoroughly and keep them aside for 10-15 Minutes


TIP 1 : Don't marinate Prawns for long as salt will pull out all the water from the Prawn... We do not want to lose moisture in Prawns before...

Now take a Flat Bottom Wide Pan… Put 3 TBSP Oil in it…Put the pan of the medium to High Heat ( Around 6 Number in US Stoves)… Try to see that oil is spread across the entire pan… The Oil should kind of start spluttering… That's when put the prawns carefully inside.. wait for 45 seconds and flip the prawns… The prawns should change colour ( turn from translucent to white ) After flipping wait for 30 seconds and flip the prawns again….

TIP 2: Remember the order in which you put the prawns inside the pan. Try to put in circular shape...While Flipping ensure that you follow the same order...
Keep Flipping them twice gently
Lower the Heat to SIM ( Number 3 in US ) Add 3 TBSP of Curd or Yoghurt 1 tsp of coriander powder 1 tsp of Cumin powder 1 tsp of salt 1 tsp of Chilli powder .5 tsp of Garam Masala powder 1 tsp of Biryani Masala ( Shan Biryani Masala) 1 handful of Brown Fried Onions 1 handful of coriander leaves and some mint leaves
Now increase the temperature from SIM to MEDIUM ( 3 to 6 again)… Keep Stirring the entire mixture for 2 minutes…. All the oil will come out and forms a good texture…. Now, switch off the flame and allow it to cool..Take out excess Oil from the mixture if you feel…
Soak 2 cups of Biryani Rice for 30-40 minutes
Take Plenty of Water… (Around 2 ltrs water)
Put 2 heap full of Tsp Salt in it 1 tsp Ghee 1 Black Cardamom 4-5 Green Cardamom 8 Cloves 2 inches worth of cinnamon 1 tsp Shahi Jeera
Let the water come to the boil… Now add the soaked rice… Keep Checking the Rice.. as soon as the Rice Grains start Twirling upside down, it is an indication to take out and drain the rice….It takes close to 3.5 to 4 Minutes …

TIP 3: Since rice to water ratio is more here, the rice will cook really fast and keep a close watch.. The Rice should be 85% -90% cooked.

The time taken to cook the rice is exactly the time needed for the prawns to cool down and soak in the masala etc…
Now start heating the prawns pan again and put it at little above SIM (Number 4 )for around 30 secs or so….. After 30 secs start adding the rice.. On the top, add the Brown Fried Onions, Ghee, 1 tsp of Biryani Masala, .5 tsp of salt, little Garam Masala, some coriander leaves, some mint leaves… Cover the entire Pan with 2 layers of Aluminium Foil, put the lid on.. Turn the heat to SIM ( Number 2). And leave it on for around 20 Minutes….
After 20 Minutes take and serve the wonderful Prawns Biryani !!! Please leave your comments and post pictures here

Monday, 24 August 2020

Manchow Soup / Hot and Sour Soup

I would like to have 1/2 spicy soup please along with starters on a rainy day... Spicy soup?? Ok... Got you!! Hot and Sour Soup is the answer....Can I have some Fried Noodles too along? Ok then it is Manchow soup then :) .. No Matter the place , no matter the age, no matter the time, we can always enjoy a bowl if not two bowls of Hot and Sour Soup


You need 
Finely Chopped Garlic (20 pods)
Finely Chopped Ginger ( 2 inches)
Finely Chopped Green Chilli (3 medium)
Finely Chopped 1/2 Big Onion
Finely Chopped 2 large carrots
Finely chopped 5 medium size mushrooms
1 cup finely chopped cabbage
2 eggs
1/2 cup Sweet Corn
3 heaped tea spoon corn flour
5 cups vegetable stock
1 lemon

Take a pan add 1 tbsp oil .. put on medium flame
Add Garlic, green Chilli and Ginger
Sauté for 30 secs
Add onion .. Sauté 1.5 minutes
Add carrot , cabbage, sweet corn, mushroom...
Add salt and pepper according to the added vegetables

Now sauté for 2 minutes

For Manchow or Hot and Sour Soup

1 teaspoon Tomato Ketchup
1 teaspoon Chill Sauce
10 drops Vinegar
1/2 teaspoon soya sauce

Add just 1 cup water initially and then add Tomato Sauce, Soya Sauce, Chill Sauce and Vinegar

Mix thoroughly and then add remaining 4 cups of water...


Add total 5 cups water..

Add salt and pepper again .. Now according to the water added.. It should be little salty as later we are going to add Corn Flour

Add Lemon juice and just before water fully boils add the following corn flour slurry and keep mixing it..

Make slurry of corn flour—-

Add corn flour mixed in seperately in 5 tbsp of water.. mix it thoroughly so that there are no clumps


Keep mixing.. After adding corn flour, the water cools down..

Now again wait till the water just boils not fully boils

.. Now very slowly add egg ( two eggs beaten nice) 

Add one tbsp of egg and verry slowly stir in straight line motion ... 

Add another tbsp of egg and then repeat the stirring verrryyy slowly.. Little strands of egg drop will form..

Once everything boils you can bring it down and serve it along with Fried Noodles... By the way, the recipe for Fried Noodles given below :)


For Manchow Soup Fried Noodles ,

Boil Hakka Noodles.. Let them cool down, add little corn flour and deep fry them for very long until it becomes like chowmein


Hakka Noodles Veg / Egg - Cravings Satiated!!

How many of us had that CRAVING for those Hakka Noodles and wished someone helped us satiate them..If you have Kids, then you sure are going to see a gleeeeee on their faces after making this when you follow the recipe :)


Don't forget the tips ..Otherwise you will lose the Plot


Ingredients

1 Packet - Ching's Hakka Noodles
1/2 cup - Julienne Cut Cabbage
4 Eggs ( For Egg Hakka Noodles)
5-6 Tablespoon Oil
10 chopped Garlic Cloves
2 Finely Chopped Green Chillies
1/2 cup - Julienne Cut Carrot (1 medium size carrot should be good).. Julienne cut is around 2 inches tall and as thiiin as possible 1-2 mm width
1/2 cup - Julienne Cut Capsicum ( If you can get red and green then great or else just green capsicum should do
3 Chopped Medium sized Mushrooms
1/2 small onion finely chopped
1-2 Teaspoon Dark Soya Sauce ( Optional)
1 teaspoon vinegar ( Along with Soya Sauce)
Pinch of Aginomoto or Tasting Salt or Chinese Salt
1 TBSP Chilli Powder
1 teaspoon Garam Masala

Garnishing
1 medium onion finely sliced
3 Spring Onion Stalks


Preparation of Noodles 


Take a wide pan for boiling water.  Add lots of Water - may be 10-12 Cups of water...Add 2 TBSP of oil to the water and bring it to boil

TIP 1 : You need to add plenty of water so that the noodles get lot space to swim separately otherwise they will start sticking together 

TIP 2 : By adding oil, the noodles stay separate after boiling..

For boiling it may take around 10-12 minutes.. Just when it starts to boil, add the noodles from the packet.

after 3-4 minutes ( keep stirring in between), the noodles are almost done 75%.. Don't overcook them, otherwise you will end up using another packet of noodles :) 

Now, drain the entire noodles and put them under running cold water. 

TIP 3: Make sure that the noodles are washed completely and also there is absolutely no heat in the noodles. They have to become cold.... Any heat left will make noodles to keep cooking... So absolutely no heat..

Spread the noodles on a flat surface,  and keep them separate.. Put some oil on them so that they stay seperated


You have to use a Thin Wok and always on high heat flame. All the chinese cooking should be done on hiiigh heat

In case of Egg Noodles, we need to prepare Eggs seperately

In the Hooot Kadai, put some 3 Tablespoons of oil and then drop the eggs.. (Don't beat the eggs before)..Just drop the eggs, add sufficient salt and chilli powder... Be generous in Chilli powder..Now start mixing the egg with spatula... There should be chunks of egg .. Don't break it to too small as burji.. NO..... Just little chunks make it thorough and good.. It will take 2 mins approximately... Since its on high heat, it will cook fast.. Remove it and keep it aside

Now, add 2 TBSP of oil to the Hot kadai

Add Chopped garlic and Green Chillies.. Saute for 15 secs
Add chopped 1/2 small onion and saute for 10 secs..

Add cabbage and add salt, chillipowder sufficient enough for cabbage... Saute for 15 secs only.. Cabbage will fry very fast so make its not burnt..

Now add Carrot and add salt, chillipowder sufficient enough for carrot..The water from carrot will make sure that cabbage is not burnt.. So, fry it for 30 secs....They should be little crunchy..

Now add Capsicum and add salt, chillipowder sufficient enough for capsicum..Saute for 15 secs..

TIP 4:

Keep adding salt and chilli powder sufficient enough whenever you are adding vegetable... That way, it will ensure that you know that the quantity of salt and also, all the vegetables will get salt and chilli powder evenly..

Now add the mushroom and salt, chillipowder and saute for 15 secs


Now add the egg fried separately to the mix..Add 1/2 teaspoon garam masala and mix throughly.. 

Optional part - Add 1 teaspoon of Soya Sauce now and mix thoroughly so that all the vegetables are coated..


Now add the Noodles on the top.. Add sufficient salt, chillipowder , garam masala , ajinomoto, soyasauce on the top.. Now Keep mixing the noodles in a special way...Just lift the noodles with the spatula and let them fall down slowly by shaking...Make sure all the noodles are lifted and dropped... Don't mix the noodles like curry.

TIP 6: Always cook noodles in small portions.. The key is everything should be quick... More Quantity means more time to cook.. More time means instead of frying, they will boil and crunchiness is lost


After tossing the noodles .. Just before putting down the flame, add vinegar and toss them again so that Vinegar is mixed..

Put them down... Add chopped spring onion stalks, and sliced onions


Noodles Craving Satiated... Happy  Cooking and Happy Eating !!!

Please do post your comments and also help spread the Joy of Cooking


Saturday, 8 August 2020

Chicken Curry - Fail Proof :)

Chicken Curry


Sunday Afternoon and Chicken Curry is a norm in most of the households... Some people just wait for that Sunday afternoon purely to indulge in their favorite chicken curry.. There are many variations for chicken curry.. Here is one variation of recipe which has never let us down and brought many a applause... Let's see how it's prepared


For Marination

Around 1.25 kgs of Skinless Chicken cut you medium size

Clean it thoroughly and spread the chicken in wide basin or plate so that you can see each and every piece of chicken..

Now put salt so that every piece gets its share. Put Masala Kharam over every piece
Around 2 tbsp of Chillipowder..(non veg requires Spice so you can put even more)

Around 1 tsp of Jeera Powder(Don’t put too much)

Around 2 TBSP of Coriander powder

1 TBSP of Pepper Powder
2 TBSP of ginger Garlic Paste(make fresh one) better make it little coarse..(Unpeeled Garlic ).. This is for Texture

Put 2 medium size lemons... This is to break the meat and make it tender

Put 2 tsp of Oil...

Now mix everything thoroughly so that every piece gets coating.

Oil is used for Binding the marinade with the chicken.

Each and every piece should have the shine of oil and with binding of the entire masala we added..


Now add little curd(just 1 tbsp) and mix it thoroughly.. Curd is to break the meat and also to make it tender.. The curd neutralizes the spice and sourness, so add very little..It also helps in binding the masalas to the meat.. It should not make it watery.. So, just little

Now mix it all again and ensure that every piece gets it share..

Now transfer it to a bowl or Dabba and seal it tightly.. Keep it in Fridge for 3-4 hrs or overnight...


Masala Paste

3-4 Elaichi
10- Cloves (the more makes it spicier)
2 inch Cinnamon Sticks
2 inch Ginger
8 Garlic Cloves
10 - pepper corns
1 tbsp Cumin seeds
2 tbsp Coriander Seeds
2 tbsp poppy seeds (optional— this makes the paste little Kammaga.. So for now avoid it)
Little Dry Coconut— This adds amazing Flavour

Now transfer it to a Mixie and make it a fine paste...

Keep adding very little water and grind it for 5 secs

Keep doing this process until it is fine paste


Preparation

Take out the marinated chicken from the fridge some 20 mins before the preparation..to make it come to room temperature

Take 4-5 medium Sized onions and finely chop it...Very fine ..The gravy should be majorly based on onions and not water.. Also don’t put more because it makes it sweet

Take 9-10 Chillies Slit in Half

Take a thick Kadai.. It should be thick so as to retain the heat and let the meat cook with the conduction method...

Now put it on High Flame.. Add 4-5 serving spoons oil.. Don’t worry on the oil as we can take it out later...

After the oil starts sputtering add the green Chillies.. Make sure the Green Chillies are cooked/Fried first.. 
TIP 1 : The oil should become spicier and that is what helps the entire curry to cook in spiciness.... This is very important Tip

Once cooked after approximately 1 minute, add Finely chopped onions
Now spread the onions across the entire Kadai and add salt sufficient to it..
You can do this on medium flame..

Now keep mixing these onions until they turn golden brown... Make sure that the onions are not boiled but fried... so you have to keep mixing.. If you keep the onions without mixing they will ooze out water and then they start boiling.. So keep mixing.. Until all the oil that is sucked oozes out.. This might take close 7-9minutes

Now add 1.5 TBSP of Wet Garam masala paste we made..mix it thoroughly with the onions .. Now fry it until all the Oil oozes out..

Now add 1 tsp of Chilli powder to this mixture...This will add Colour and taste
..

Transfer the chicken into the Kadai and mix it thoroughly very thoroughly so that all the pieces get evenly coated with the mixture ..


Don’t add any water.. this one should be on medium flame.. Keep mixing it..for 2 Minutes.... The Onions in the masala mix should be almost invisible and should be mixed up in the paste...

Once you kind of start seeing that, now close the lid and lower the flame to slight less medium .. Add very little water only if needed.. Like 1/2 cup or so.... Now Water  from Chicken also will start coming out of Chicken and Chicken should cook in its own stock only.. Just  mix slightly, the chicken every 3 minutes or so.. Should not let chicken stick to the bottom is our aim.. After 15 mins or so, check the chicken if you are able to cut with a spoon.. That’s when it is cooked and open the lid... 
Check the taste of the gravy now and see if additional Chilli Powder or Salt should be added..If you add chilli powder make sure that it is mixed and cooked otherwise the raw taste of chilli powder will bite you :).. Remember the chicken is already cooked so be gentle while mixing otherwise you will end up with shredded chicken..
Now add little water if needed for the consistency.. All the oil should float.. This probably takes another 10 minutes or so....


Chicken Curry Katam aur Abhi Khana Shuru Hojayee !!

Andhra Spicy Chicken Roast !!!


Andhra Spicy - Chicken Roast  (Can call it Chicken Fry too if you want :) )


Quintessential item in any Andhra Hotel..Andhra food is sometimes associated with spiciness..( Even if  you say most of the times, it doesn't surprise me)... Any non-veg loving person would like to have something that can be eaten any time and with anything... Like with just ghee rice, rasam rice, roti, chapatti, Rumali Roti, Biryani.. Absolutely with anything and everything....One of the best things that fits that requirement is Andhra Spicy Chicken Roast / Fry... Let's see how we can assure that craving is satisfied !!


For Marination

Around 1.25 kgs of Skinless Chicken cut you medium size

Clean it thoroughly and spread the chicken in wide basin or plate so that you can see each and every piece of chicken..

Now put salt so that every piece gets its share
Put Masala Kharam over every piece
Around 2 tbsp of Chillipowder..(non veg requires Spice)

Around 1 tsp of Jeera Powder(Don’t put too much)

Around 2 tbsp of Coriander powder

1 tbsp of Pepper Powder
2 tbsp of ginger Garlic Paste(make fresh one) better make it little coarse..(Unpeeled Garlic ).. This is for Texture

Put 2 medium size lemons... This is to break the meat and make it tender

Put 2 tsp of Oil...

Now mix everything thoroughly so that every piece gets coating
Oil is used for Binding

After you see the shine on each and every piece binding the entire masala we added..


Now add little curd(just 1 tbsp) and mix it thoroughly.. Curd is to break the meat and also make it tender.. The curd neutralizes the spice and sourness so add very little..It also helps in binding the masalas to the meat.. It should not make it watery.. Just little

Now mix it all again and ensure that every piece gets it share..

Now transfer it to a bowl or Dabba and seal it tightly.. Keep it in Fridge for 3-4 hrs or overnight...


Now for Masala Paste

3-4 Elaichi
10- Cloves (the more makes it spicier)
2 inch Cinnamon Sticks
2 inch Ginger
8 Garlic Cloves
10 - pepper corns
1 tbsp Cumin seeds
2 tbsp Coriander Seeds
2 tbsp poppy seeds (optional— this makes the paste little Kammaga.. So for now avoid it)
Little Dry Coconut— This adds amazing Flavour

Now transfer it to Mixie and make it a fine paste...

Keep adding very little water and grind it for 5 secs

Keep doing this process until it is fine paste


Preparation

Take 4-5 medium Sized onions and finely chop it...Very fine ..The gravy should be majorly based on onions and not water.. Also don’t put more because it makes it sweet

Take 9-10 Chillies Slit in Half

Take a thick Kadai.. It should be thick so as to retain the heat and let the meat cook with the conduction method...

Take out the marinated chicken from the fridge some 20 mins before the preparation..to make it come to room temperature

Now put it on High Flame.. Add 4-5 serving spoons oil.. Don’t worry on the oil as we can take it out later...

After the oil starts sputtering add the green Chillies.. Make sure the Green Chillies are cooked/Fried first.. The oil should become spicier...

Once cooked after approximately 1 minute, add Finely chopped onions
Now spread the onions across the entire Kadai and add salt sufficient to it..
You can do this on medium flame..

Now keep mixing these onions until they turn golden brown... Make sure that the onions are not boiled but fried... so you have to keep mixing.. If you keep the onions without mixing they will ooze out water and then they start boiling.. So keep mixing.. Until all the water that is sucked oozes out.. This might take close 7-9minutes

Now add 1.5 TBSP of Wet Garam masala paste we made..mix it thoroughly with the onions .. Now fry it until all the Oil oozes out..

Now add 1 tsp of Chilli powder to this mixture...This will add Colour and taste
..

Transfer the chicken into the Kadai and mix it thoroughly very thoroughly so that all the pieces get evenly coated with the mixture ..


Don’t add any water.. this one should be on medium flame.. Keep mixing it..for 2 Minutes.... The Onions in the masala mix should be almost invisible and should be mixed up in the paste...

Once you kind of start seeing that, now close the lid and lower the flame to slight less medium .. Add very little water.. Like 1/2 cup or so.... Now Water  from Chicken also will start coming out of Chicken and Chicken should cook in its own stock only.. Just  mix slightly the chicken every 3 minutes or so.. Should not let chicken stick to the bottom is our aim.. After 15 mins or so, check the chicken if you are able to cut with a spoon.. That’s when it is cooked and open the lid... Now add little water if needed for the consistency.. All the oil should float.. That’s Chicken Curry....For chicken fry take out the chicken pieces 1 minutes before the curry is done with very little gravy.. That’s when take out the Chicken pieces into a seperate Kadai.. The Kadai should be on high flame and complete hot...Take the oils from the chicken curry..(you can seperate oil from that).. Put oil and the chicken pieces.. Add Curry leaves and Cashew nuts ...Keep mixing the Chicken pieces thoroughly until all the water evaporates and sticks to chicken pieces.. Chicken Roast is done.. you can add some fried Chillies at the last.. ( Chillies fried in Chicken Curry oil:)


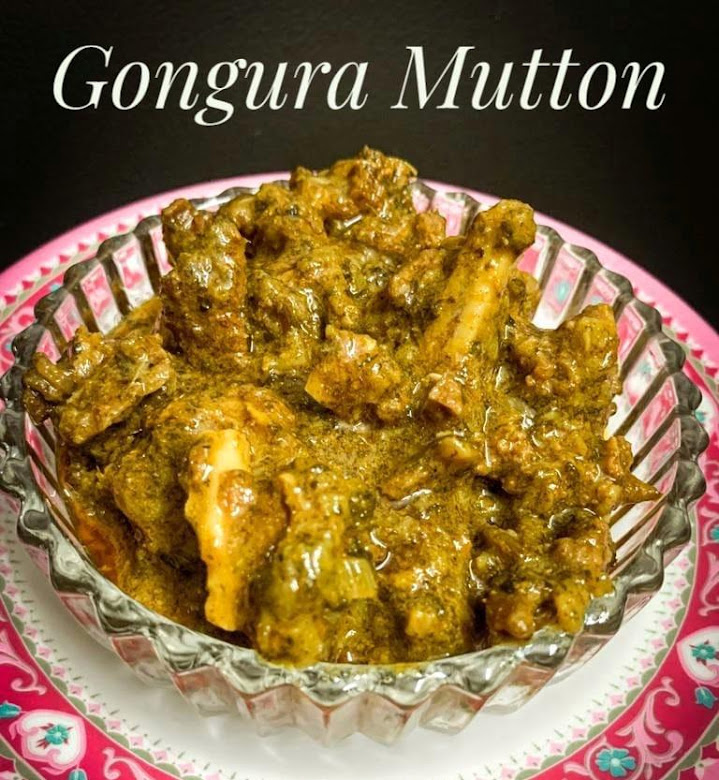
Gongura Mutton - Andhra Delicacy !!

Gongura Mutton 

If you have lived in Andhra and are a Mutton fan then you must definitely be a Gongura Mutton Fan... This dish is sure to please all mutton fans and one of those dishes which invigorates all your taste buds... Spicy, Tangy and everything :).. This is difficult to prepare, so be careful while preparing... But you can be rest assured you are going to succeed most of the times if you follow the recipe..


For Marination

Around 1/2 kg of Mutton Cut into medium pieces Shoulder / Leg meat preferably

Clean it very thoroughly and spread the Mutton in wide basin or plate so that you can see each and every piece of it

Now put salt so that every piece gets its share
Put Masala Kharam ( This is special karam which you will get in Kirana stores which comprises of lot of spices) .. It should be put over every piece
Next put Around 2 tbsp of Chillipowder..(non veg requires Spice)

2 tbsp of ginger Garlic Paste(make fresh one) ..

Put 2 medium size lemons... This is to break the meat and make it tender..
Put a spoon of meat tenderizer which you will get it in markets.. Or 2 tbsp of Raw papaya paste

Now mix everything thoroughly so that every piece gets coating

After you see the masala we added on every piece ,

Now transfer it to a bowl or Dabba and seal it tightly.. Keep it in Fridge for 1-2 hrs or overnight if you want it


Masala Paste

3-4 Elaichi
10- Cloves (the more makes it spicier)
2 inch Cinnamon Sticks
2 inch Ginger
8 Garlic Cloves
10 - pepper corns
1 tbsp Cumin seeds
2 tbsp Coriander Seeds
2 tbsp poppy seeds (optional— this makes the paste little less spicier.. So for now avoid it)

Now transfer it to Mixie and make it a fine paste...

Keep adding very little water and grind it for 5 secs

Keep doing this process until it is fine paste


Gongura Paste

Method to prepare Gongura Paste depends on the sourness of the leaves... Take lots of leaves, add some oil and salt and put them in kadai... In little low to medium flame... Keep Sauting, close the lid, let it cook in its own water... then Take off the lid and keep saluting and mixing until you get a thick paste...


Pre cooking


Take out the Mutton from the fridge atleast 1/2 hr before cooking
Take a wide pressure pan , put 2 tbsp of oil..
put the Mutton pieces in it and fry the Mutton pieces for 2 minutes.. ensure that all the Mutton is nicely coated with the oil..

After this Add 1.5 cups of water

Remember that there is lot of fat in the Mutton , so it will ooze out oil while boiling.. Mutton will not give out much water like chicken.. So be conscious of the water you are going to add.. You will use this stock later while cooking


Now boil the Mutton in Cooker for 2-3 whistles depending upon the tenderness of the Mutton.. I prefer 2 whistles and remaining slow cooking

After you stop the pressure pan, let it cool and separate out pieces and stock


Curry Preparation

Take 3-4 medium Sized onions and finely chop it...Very fine ..The gravy should be majorly based on onions and not water.. Also don’t put more because it makes it sweet

Take 9-10 Chillies Slit in Half

Take a thick Kadai.. It should be thick so as to retain the heat and let the meat cook with the conduction method...

Now put it on High Flame.. Add 3 serving spoons of oil.. Remember that there is lot of oil in the stock given out by Mutton

After the oil starts sputtering add the green Chillies.. Make sure the Green Chillies are cooked/Fried first.. The oil should become spicier...

Once cooked after approximately 1 minute, add Finely chopped onions
Now spread the onions across the entire Kadai and add salt sufficient to it..
You can do this on medium flame..

Now keep mixing these onions until they turn golden brown... Make sure that the onions are not boiled but fried... so you have to keep mixing.. If you keep the onions without mixing they will ooze out water and then they start boiling.. So keep mixing.. Until all the oil that is sucked oozes out.. This might take close to 7-9minutes

Now add 1.5 TBSP of Wet Garam masala paste we made..mix it thoroughly with the onions .. Now fry it until all the Oil oozes out..

Now add 1 tsp of Chilli powder to this mixture...This will add Colour and taste
..

Transfer the Mutton pieces into the Kadai and mix it thoroughly very thoroughly so that all the pieces get evenly coated with the mixture ..

Keep Frying for 4-5 minutes... Now add the stock which we took separately .. Let the Mutton pieces cook in slow flame with covered lid

Keep mixing it once in a while around every 4 -5 minutes or so...keep checking if Mutton is soft enough.. Once it is soft enough, take out the lid and increase the flame and bring it to the consistency you want.. This would probably take around 25-30 mins... Now add 2-3 Tbsp of Gongura Paste based on the tanginess you want...Mix it thoroughly so that all the mutton pieces are evenly coated...Since the Gongura Paste is separately cooked and Mutton also fully cooked, its matter of combining both the flavors... So, now cook them together for around 5 mins on medium flame or so...

All the oil should float..

Once done,  Your Yummy Gongura Mutton is ready to be served to your esteemed guests or eagerly waiting Family members... Remember that it is sometimes better to eat after resting it for 1 hr or so...!!


Chicken Pakoda - Perfect Snack for everything :)

Chicken Pakoda Recipe

Who doesn't like to munch on Chicken Pakoda given a chance...Ofcourse when someone prepares it and serves us , its brilliant... What if you want to eat the perfectly made one?  You need perfect Recipe for it ... Recipes which are tried and tested are the perfect ones.. So, here goes the one which when followed religiously is going to please you to the hilt


Take Boneless Breast - 250 gms cut into smaller cubes
Salt around - 1 tsp
Chilli Powder - 1 1/2 tsp 
Pepper Powder - 1/2 tsp 
Oil - 1 tsp
Ginger Garlic Paste - 1 tsp

Mix all of them thoroughly and let it sit for 2 hrs..

Next After 2 hrs
Add 1/2 egg beaten (Don’t add too much egg which makes it flowy as you will have to again compensate with Flour.. So just enough egg)
Add 
 Corn Flour - 2tsp
Maida - 1tsp
Kashmiri Lal Mirchi Powder -1 tsp for colour.. 

Mix them throughly.. 

The consistency should be thick.. with each piece coated with the mix lightly..

Now slit 10 Chillies into halves

Also take a spring of curry leaves

Take a Kadai with Oil to Fry.. 

The oil should be fully hot... First fry the Chillies and Curry leaves till they are crisp and keep them aside.. Frying the Chillies in the oil makes the oil spicy..This will be help while frying the Chicken..


Now put the chicken pieces in the oil such a way that entire Kadai is full of pieces.. This way pieces fry evenly.. Now slightly reduce the flame to Medium-High.. Keep Flipping the pieces intermittently until you get the desired colour and consistency.. Typically takes 3-4  minutes of deep frying as the pieces are slightly smaller cubes.. The pieces are done frying when you are able to cut the pieces with little spoon or ladle...


Next take them out.. Put all the pieces in a mixing bowl, add the freshly fried Chillies and Curry leaves, add little Garam masala and toss them..


You are definitely going to like your Chicken Pakoda !! Please do leave comments

Chicken Majestic - Truly Majestic

Chicken Majestic Recipe

Once you are in Hyderabad, you will never miss this ... Here goes the recipe


Take 500 gms of Boneless Chicken Breast

Cut them into thin strips… The strips should be of the size of Kurkure :) 

Salt them enough and then soak them in Buttermilk overnight…. Soaking in Buttermilk actually makes meat tender and makes the chicken retain more moisture

Next Day take out this Chicken 3 hrs before making 

After taking out, 

Add 1 egg
 2 TBSP Corn Flour
1 TBSP Oil,
1 teaspoon Maida
1 teaspoon Rice Flour
Make a paste of Ginger, Garlic and Green Chili and add 1 1/2 TBSP of it
1 teaspoon Pepper Powder
1 teaspoon Kashmiri Chilli Powder

Mix all of these along with Chicken… The chicken should be just coated enough absolute no water…

Now keep it aside for 2 hrs

Now heat the oil in a pan in medium heat… 

Tip :  To know whether the oil is hot enough , dip a back side of wooden ladle in the oil…
 1. Bubbles not coming , oil not hot enough
  1. After dipping if bubbles  are forming around the laddle, medium hot and good indication
  2. Bubbles shouldn’t come too fast.. It means Oil is really hot…Reduce the heat and let it cool down.

Just test it with one chicken strip and you will not…

If oil is less hot, the chicken will soak lot of oil… So, oil should be hot enough…


Put them in the batches… Don’t over crowd the oil kadai…

Usually since the chicken strips are thin , they will fry really fast… so max 2-3 minutes…

Fry and keep them aside…


Now finely shop around 25 Garlic Cloves

Slit 10 Green Chill in half

2 Large Spring of Curry leaves…


Take a pan, put around 1 1/2 tbsp of oil

Put Garlic Cloves, Green Chilli and Curry Leaves and sauté them

Put the heat on low and do following

Add 1/2 cup curd .. ( around 2 tbsp of Curd )

1 teaspoon coriander powder
1/2 teaspoon jeera powder
1/2 Handful of mint
1 tbsp Chilli Powder
Little salt.. just enough for the Curd added

Now put it in High Flame and thicken the curd and eventually it will disappear… 
Now add little Soya sauce and add the Chicken pieces…

Just add a pinch of Ajinomoto

And fry for mix for 2 minutes and switch off the flame…

Absolutely Delicious Chicken Majestic is Ready !!


Chicken 65 - Evergreen Favorite

Chicken 65 Recipe


We heard this name many times and we just can't believe how many stories are told around it... Everyone have their own versions of it... Here is our version of it...You sure have succeeded if everyone in your family enjoyed it to the core.. Do you also want to be a part of that joy... Then the wait is over!!


Take 500 gms of Boneless Chicken Breast

Cut them into  cubes…Approximately size of top part of  index finger :)


Add Salt, 
Finely Chopped Green Chillies
Finely Chopped Curry Leaves
1 TBSP Coriander Powder
1 tsp Jeera Powder ( Note its only 1 teaspoon)
1 tsp Pepper Powder
2 TBSP Masala Karam..( You will get Masala Karam in India) you can skip it if you don’t have it
2 TBSP Red Chilli powder
1 TBSP Ginger Garlic Paste
2 Teaspoons Kashmiri Red Chilli Powder…( 
1 TBSP Oil and mix it thoroughly

Now add 2 1/2 Heaped TBSP Corn Flour 
1 TBSP Maida
1/2 Teaspoon Baking Powder

Add little water to the mix so that it get coated 


Mix and Coat it thoroughly The chicken should be just coated enough absolute no watery kind… Check for the coating of Corn Flour… It should kind of cover the chicken just enough… No part of chicken should be visible.

Now keep it aside for 2 hrs

Now heat the oil in a pan in medium heat… 

You know the tip if Oil is hot enough or not right ;)


Put them in the batches… Don’t over crowd the oil kadai..

Deep Fry on Medium Heat only and cook only 70% ( 2.5 minutes).. Remove them and keep them aside.


Let them cool down a bit… Once all the chicken pieces are done… Now start 2nd round of frying.. 

Take very little number of pieces in each batch… Approximately 75% of 1st Round batches….

Deep Fry chicken pieces on High heat and alongside put Slit Green Chillies and Curry leaves…. Chicken should fry along with Green Chillies and Curry leaves..


Remember this entire thing should be done on high heat and keep mixing it thoroughly… after 1.5 minutes or so… Take them aside… 

For little punch, you can add very ittle garam masala and toss the chicken pieces..(This is optional)

Your Favorite Chicken 65 is ready !!!

Mangalore Chicken Ghee Roast

Mangalore Chicken Ghee Roast Recipe !!


Ingredients


1 Kg Bone In Chicken 
Salt to Taste
Around 2 TBSP Chilli Powder 
1/2 tsp Turmeric
1 cup yoghurt
1 medium finely chopped onion
6-7 TBSP of GHEE
10 Bydagi Chillies / Kashmiri Red Chillies
7 RedChillies
2 TBSP Coriander Seeds
2 teaspoons Cumin Seeds
1/2 Teaspoon FenugreekSeeds
25 Garlic Cloves
2 Big Lemon Size Tamarind

1 tsp Jaggery
1 small lemon


For Marination

Marinate Chicken with salt , Chilli Powder, Yoghurt and Turmeric and little lemon juice (optional)

Marinate for minimum 2 hrs

For Masala

Dry Roast Bydagi Chillies and Guntur Red Chillies first…for 1-2 minutes until the inside oil from Chillies comes out

Next add Coriander Seeds, Cumin, Pepper Corns, Fenugreek Seeds,.. Dry roast them until the aroma comes out… Don’t blacken them.. Remember don’t blacken them..

Now put them aside and let it cool down..

Now take them into blender, add garlic, Tamarind and little  water and grind it into fine paste…

( We will use only half the paste )

Take a Kadai, put 5 TBSPs of GHEE and then add marinated chicken to it..

Now cook it on medium flame and let the chicken cook till 75% … You should be able to poke the Chicken with a Fork easily… 

Take out the Chicken Pieces, leaving the ghee and little chicken stock inside the kadai only… 
The ghee floats on the top in the stock… Try to separate them both ….Take out the entire stock from the kadai… Just leave the Ghee inside the Kadai

Add Chopped onion to the ghee , salt and fry them until they are golden brown..

Now add the masala paste ( Just half of what we made) 2 TBSP of Masala Paste
To the kadai and add little salt enough for the masala paste.. 

Now fry it a little for 2 minutes… Add the Chicken stock now to the mix..Get it to consistency where most of the stock evaporated and ghee is floating on the top of masala mix….

Now add the chicken pieces to this one… Mix it thoroughly.. Add another2 TBSP of Ghee to it…. …. Add Jaggery to it…..Now put it in the High Heat so that the Masala Mix sticks to the chicken throughly and the chicken cooks along …. Keep mixing throughly… for 5 minutes or so… Now add good amount of curry leaves… mix it well and fry for 1 minute…… 


Super Delicious Mangalore Chicken Ghee Roast is ready

LinkWithin

Related Posts Plugin for WordPress, Blogger...