Showing posts with label Non-Veg. Show all posts

Tuesday, 22 September 2020

Loose Prawns


Loose Prawns is that starter on the menu which will always have most of the eyes looking for...If you have nailed it then there won't be any better dish around to enjoy with a bowl of Hot Soup! Here I present to you the recipe to enhance your taste buds for that lovely evening !!


Ingredients

Cleaned and Deveined Prawns - around 30 Medium ..(Deveining is very much important)

TIP 1: To remove smell of prawns, clean the prawns with some milk... Put Prawns in milk and keep washing them in that milk

After washing the prawns, fully dry them with Kitchen towel.. Do not forget this part.

Salt around - 1- tsp - For Taste.. Remember usually prawns are usually salty so be careful while adding salt
Black Pepper Powder - 1 TBSP ( You can add more if you want)
White Pepper Powder - 1 TBSP 
Ginger Garlic Paste - 1 TBSP
1/2 Egg
Vinegar - 1 teaspoon
1 lemon
Corn Flour - 2 TBSP
Maida - 3/4 TBSP
Rice Flour - 1/2 TBSP


Mix them throughly and apply the marinade to all the prawns.. The consistency should be thick

Leave it for 1/2 rs...

Chopped Garlic - 20
Chopped Green chillies - 8

Preparation

Take oil in pan and put it in medium flame... The Oil shouldn't be too hot..If its too hot just switch off the flame and let it cool down... The temperature of oil is very important.

Now put the Prawns in the oil slowly such a way that entire Kadai is full of pieces.. This way pieces fry evenly.. Do not touch the prawns for 30 secs... Keep mixing the pieces intermittently until they are 3/4 th  cooked ( They should curl and also have slight golden brown color).... Typically takes 1 to 1.5 Mins of deep frying .. Now take them aside

After entire prawns are 3/4 th cooked take them out.  increase the flame to High for 2nd time frying... Now take pieces in small batches ..and put them in Hot Oil...The Oil should be very hot...Don't touch them until 20 secs... Now cook them for only 1 minutes... Prawns cook really fast so be careful about that...Don't over cook..

The colour will change to good golden brown colour.. Take them out.. 

Take a pan, add little oil and once the oil is hot put little turmeric ( You can add Turmeric while Marinating if you want and avoid here ) , garlic and green chillies... They will fry within 15-20 secs.. After that put the prawn pieces and toss them... The Prawn pieces will get a slight coating of garlic and chillies...


You can very well eat them on its own and relish each and every piece of goodness!!

Fish Fry urff Chepala Vepudu !!

Fish Fry / Chepala Vepudu

Fish Fry and Rasam Rice  is Amazing Combination!! It has the  most heavenly taste when cooked properly


Fish is most nutritious of all the Non-Vegetarian items and very good for health...
There are various varieties of fishes and each fish has its own cooking style / taste.. This recipe can be used for most of the fishes like Rohu / Mackerel (Vanjaram)/ King Fish / Seer Fish / Korameenu etc...People residing near Seashore places love Sea Fish Fry and people who are far away also love them a lot but they would probably only get Fresh Pond / River Fish... If you don't get any fresh fish, you are probably unlucky as you might have to adjust with a frozen fish.. Never Mind as long as you can eat Fish Fry.. Why wait long...
Simply dive into Recipe


Preparation Time - 10 mins
Marination Time - 1 Hr
Cooking / Fry Time - 8-10 mins per batch


Ingredients

Fish Pieces (Rohu / Vanjaram )- 1 kg.. The fish pieces shouldn't be very thick or very thin... 

Ginger Garlic Paste - 2 TBSP
Salt to taste - Approximately 2 teaspoons
Chilli Powder - 2 TBSP
Coriander Powder - 1 TBSP
Cumin Powder - 1 Teaspoon
Pepper Powder - 1 TBSP
Turmeric - 1/2 Teaspoon
Oil - 2 teaspoons for marination
Lemon - 1 Large

Oil for Shallow Fry


TIP 1 : Wash fish thoroughly with Turmeric and salt so that the fishy smell is gone.
TIP 2 : After washing pat dry each and every fish so that there is absolutely no moisture

Mix all the Marination Ingredients (Ginger Garlic Paste, Salt, ChilliPowder, Coriander Powder, Cumin Powder, Pepper Powder, Lemon) in a bowl and mix thoroughly...  Now add Oil and mix it in the marinade...

TIP 3: Poke the fish pieces with a fork slightly before applying the marinade so that the marinade will seep in and stick to the fish pieces even while frying

Now apply the marinade to the fish pieces very carefully individually.. This will take time but having patience will reap good rewards..


Shallow Frying :

Now take a Tawa and put some oil on it... Spread the oil in the Tawa and some extra oil in the centre of the Tawa...

The flame should be low - medium..
Put the fish pieces carefully around tawa.. Not at the centre where extra Oil is there... ( The heat at the centre is more than in the outer areas...)

If you put around 5 Pieces in the Tawa then put the pieces in round robin fashion in the centre for 1 minute each and bring them back to the outer ring where heat is low... keep doing this for 4-5 minutes on one side of the fish... Now flip the fish pieces carefully to the other side and repeat the process of Round Robin in and out and after 1 minute take out the fish pieces and serve them HOT with onions...


TIP 4: While putting the Fish pieces on the Tawa, place the Top side down on the Tawa... i.e. When you put the Marinade, if Side A is on the top, put the Fish in the Tawa with Side A at the bottom because Side B some marinade might have been removed as it was doing sticking to the vessel... Now Before flipping on the Tawa, apply some  Marinade on Side B and flip it so that it goes to the bottom with proper Marinade :)

TIP 5: Remember the order in which you have placed the Fish Pieces in the Tawa so that, you know the order in which you have to put them in centre and also know the order in which you have to flip it


Fish Fry goes very well with Rasam Rice... 

Friday, 18 September 2020

Pepper Chicken - Crispy and with the Zing !

Pepper Chicken

Every now and then we keep wondering what if we can't go to restaurants... Will we be able to get the same taste and experience of our favourite dishes ? Do we have enough ingredients and cook ware to make them the most delicious dishes... All those fears can be laid to rest with this blog post... Don't worry because this is time to make that favorite dish..


Marination

Take Boneless Breast - 500 gms cut into decent size cubes (Make sure
Salt around - 2-3 tsp - ( For taste)
Chilli Powder - 2  tsp 
Black Pepper Powder - 1 TBSP
White Pepper Powder - 1 TBSP 
Oil - 2 tsp
Ginger Garlic Paste - 1 TBSP

1 Egg White alone - Don't put egg yolk. Its Just Egg White

Add  Corn Flour - 2 TBSP
Maida - 1 TBPS
Kashmiri Lal Mirchi Powder - 1 Heaped Table Spoon for colour.. 

Mix them throughly.. Make sure that each piece gets enough coating and the coating is standing 

The consistency should be thick.. Not runny at all..

Leave it for 2 hrs...

After 2hrs just check for the pieces as Chicken might loose some water... Now just add little cornflour to bring it back to thick consistency if needed

Preparation

Now slit 10 Chillies into halves 

Also take a spring of curry leaves

Take a Kadai with Oil to Fry.. 

The oil should be fully hot... First fry the Chillies and Curry leaves till they are crisp and keep them aside.. 

Frying the Chillies in the oil makes the oil spicy.. You can use these chillies later if needed..This will be help while frying the Chicken..


Now put the chicken pieces in the oil such a way that entire Kadai is full of pieces.. This way pieces fry evenly.. Now slightly reduce the flame to Medium-High.. Keep mixing the pieces intermittently until they are 3/4 th  cooked.... Typically takes 2 to 3  minutes of deep frying .. Now take them aside


Sprinkle some Black pepper on them and just mix them slightly so that the chicken pieces are coated with pepper..

After entire batches of chicken are 3/4 th cooked, increase the flame to High for 2nd time frying... Now take pieces in small batches ..and put them in Hot Oil...
TIP 1: (Remember small batches and we want to cook on high flame very fast) . 
TIP 2: Don't touch them until 30 secs... ( They will be very very  sticky if you touch them).. After 30 secs or so Now start separating the chicken pieces and deep fry them for another 1 minutes... You can see the color changing quickly and they becoming crisp... You can feel the crispiness when you try to bounce them on your ladle... 


Take them out ...put them in a mixing bowl and toss little garam masala and also some pepper on top of all the chicken pieces... Enjoy your Restaurant style Pepper Chicken !! Please try the recipe and leave the comments


Monday, 7 September 2020

Chicken Tangdi Malai Kebab - Pleasing to Everyone and Everything!!


It's just not a Spicy World but you also have other Milder, Tasty, Juicy version to please the Kid in you .. Everyone now and then we keep hearing from the kids and others too , can we have something non spicy but tasty?? Can we have it in chicken.. Many a time we keep looking at those Kebab Rods hanging at the Tandoor in the restaurants and wish we can have them... How about if we can make them at home?? 

This is the place to know that you can do it!!


Ingredients

4 Chicken Drumsticks 
2 tsp White Pepper Powder
1/2 cup fresh cream
1/2 cup Hung Curd
1/2 cup Mozarella cheese
1 TBSP Lemon Juice
6 Green chillies
1/2 bunch Coriander leaves
1 TBSP Ginger Garlic Paste
1 cup Salted Buttermilk
Salt to taste
Butter for Basting

There are 3 stages of Marination which I am going to explain

Marination  Stage1 

Put some gashes in the drumsticks and soak them in Salted Buttermilk for 3-4 hrs or overnight.. The buttermilk should be smooth and shouldn't have any chunks in it... Marinating in Buttermilk will make the meat tender and meat will retain juiciness


Marination Stage2

Take out the Chicken and drain out excess Buttermilk..Now add little salt, 1 tbsp pepper, ginger Garlic paste and Lemon juice and keep it aside ( The lid should be closed).. This should be left alone for 30 mins to 1 hr

Marination Stage3

Now in a bowl, take cheese, hung curd and mix them thoroughly... Knead them together... Make a paste out of cheese....
Now add cream and mix throughly.. Add little salt ( Remember we added salt twice already )  .. Now taste the mixture and see if salt is enough ..

Add remaining 1 TBSP White Pepper Powder ( you can add more if you want).. 

Make a coarse paste of green chilli and coriander... Now add that coarse paste and mix thoroughly...Now again taste the mixture .. If all good then coat the Drumsticks with this marinade fully....

Now stick the drumsticks into the skewers...Now baste it with Butter all around..

To Cook in Oven,

Preheat the oven to 250˚C and place the skewers in the middle rack..... Now switch on the Toast Mode ( Both top coil and bottom coil to be on with Convection fan on)

Keep watching and after every 10 minutes, look and brush with some Butter.. After 20 Minutes, flip them over and baste with some more butter... if you have earlier marinade just brush it on the Drumsticks if possible.. After another 20 minutes, take them out.. In total 40 Minutes.. You can wrap with foil at the other end...

I had an OTG Morphy Richards 52 RCSS which has Rotisserie and I used it for perfection.. I need not place the chicken on the racks but its a revolving Rotisserie that did the trick

Enjoy your Chicken Tangdi/ Drumsticks Malai Kebab along with your children...


Wednesday, 26 August 2020

Prawns Biryani - Who can resist?


Lovers of seafood will never leave any chance to devour this delectable dish.. Prawns and Biryani are 2 words which make us drool over and over....Prawns are something which are very difficult to cook... Reason being if you cook for lesser time, you will have that raw smell / taste and undercook.. If you overcook it, you will end up with a rubbery prawn which I am sure you definitely don't want.

Tips and timings in this regard always help.. Don't miss them in the following post..


Here goes Prawns Biryani Recipe

To Serve 3-4 people depending on an average appetite :)
Prawns -25-30 Prawns medium sized

Marination

add 1 tsp salt, 1 .5 tsp Chilli Powder 1.5 tsp GingerGarlic Paste 1 tsp Coriander Powder 1 tsp Cumin Powder
Mix all of them thoroughly and keep them aside for 10-15 Minutes


TIP 1 : Don't marinate Prawns for long as salt will pull out all the water from the Prawn... We do not want to lose moisture in Prawns before...

Now take a Flat Bottom Wide Pan… Put 3 TBSP Oil in it…Put the pan of the medium to High Heat ( Around 6 Number in US Stoves)… Try to see that oil is spread across the entire pan… The Oil should kind of start spluttering… That's when put the prawns carefully inside.. wait for 45 seconds and flip the prawns… The prawns should change colour ( turn from translucent to white ) After flipping wait for 30 seconds and flip the prawns again….

TIP 2: Remember the order in which you put the prawns inside the pan. Try to put in circular shape...While Flipping ensure that you follow the same order...
Keep Flipping them twice gently
Lower the Heat to SIM ( Number 3 in US ) Add 3 TBSP of Curd or Yoghurt 1 tsp of coriander powder 1 tsp of Cumin powder 1 tsp of salt 1 tsp of Chilli powder .5 tsp of Garam Masala powder 1 tsp of Biryani Masala ( Shan Biryani Masala) 1 handful of Brown Fried Onions 1 handful of coriander leaves and some mint leaves
Now increase the temperature from SIM to MEDIUM ( 3 to 6 again)… Keep Stirring the entire mixture for 2 minutes…. All the oil will come out and forms a good texture…. Now, switch off the flame and allow it to cool..Take out excess Oil from the mixture if you feel…
Soak 2 cups of Biryani Rice for 30-40 minutes
Take Plenty of Water… (Around 2 ltrs water)
Put 2 heap full of Tsp Salt in it 1 tsp Ghee 1 Black Cardamom 4-5 Green Cardamom 8 Cloves 2 inches worth of cinnamon 1 tsp Shahi Jeera
Let the water come to the boil… Now add the soaked rice… Keep Checking the Rice.. as soon as the Rice Grains start Twirling upside down, it is an indication to take out and drain the rice….It takes close to 3.5 to 4 Minutes …

TIP 3: Since rice to water ratio is more here, the rice will cook really fast and keep a close watch.. The Rice should be 85% -90% cooked.

The time taken to cook the rice is exactly the time needed for the prawns to cool down and soak in the masala etc…
Now start heating the prawns pan again and put it at little above SIM (Number 4 )for around 30 secs or so….. After 30 secs start adding the rice.. On the top, add the Brown Fried Onions, Ghee, 1 tsp of Biryani Masala, .5 tsp of salt, little Garam Masala, some coriander leaves, some mint leaves… Cover the entire Pan with 2 layers of Aluminium Foil, put the lid on.. Turn the heat to SIM ( Number 2). And leave it on for around 20 Minutes….
After 20 Minutes take and serve the wonderful Prawns Biryani !!! Please leave your comments and post pictures here

Saturday, 8 August 2020

Chicken Curry - Fail Proof :)

Chicken Curry


Sunday Afternoon and Chicken Curry is a norm in most of the households... Some people just wait for that Sunday afternoon purely to indulge in their favorite chicken curry.. There are many variations for chicken curry.. Here is one variation of recipe which has never let us down and brought many a applause... Let's see how it's prepared


For Marination

Around 1.25 kgs of Skinless Chicken cut you medium size

Clean it thoroughly and spread the chicken in wide basin or plate so that you can see each and every piece of chicken..

Now put salt so that every piece gets its share. Put Masala Kharam over every piece
Around 2 tbsp of Chillipowder..(non veg requires Spice so you can put even more)

Around 1 tsp of Jeera Powder(Don’t put too much)

Around 2 TBSP of Coriander powder

1 TBSP of Pepper Powder
2 TBSP of ginger Garlic Paste(make fresh one) better make it little coarse..(Unpeeled Garlic ).. This is for Texture

Put 2 medium size lemons... This is to break the meat and make it tender

Put 2 tsp of Oil...

Now mix everything thoroughly so that every piece gets coating.

Oil is used for Binding the marinade with the chicken.

Each and every piece should have the shine of oil and with binding of the entire masala we added..


Now add little curd(just 1 tbsp) and mix it thoroughly.. Curd is to break the meat and also to make it tender.. The curd neutralizes the spice and sourness, so add very little..It also helps in binding the masalas to the meat.. It should not make it watery.. So, just little

Now mix it all again and ensure that every piece gets it share..

Now transfer it to a bowl or Dabba and seal it tightly.. Keep it in Fridge for 3-4 hrs or overnight...


Masala Paste

3-4 Elaichi
10- Cloves (the more makes it spicier)
2 inch Cinnamon Sticks
2 inch Ginger
8 Garlic Cloves
10 - pepper corns
1 tbsp Cumin seeds
2 tbsp Coriander Seeds
2 tbsp poppy seeds (optional— this makes the paste little Kammaga.. So for now avoid it)
Little Dry Coconut— This adds amazing Flavour

Now transfer it to a Mixie and make it a fine paste...

Keep adding very little water and grind it for 5 secs

Keep doing this process until it is fine paste


Preparation

Take out the marinated chicken from the fridge some 20 mins before the preparation..to make it come to room temperature

Take 4-5 medium Sized onions and finely chop it...Very fine ..The gravy should be majorly based on onions and not water.. Also don’t put more because it makes it sweet

Take 9-10 Chillies Slit in Half

Take a thick Kadai.. It should be thick so as to retain the heat and let the meat cook with the conduction method...

Now put it on High Flame.. Add 4-5 serving spoons oil.. Don’t worry on the oil as we can take it out later...

After the oil starts sputtering add the green Chillies.. Make sure the Green Chillies are cooked/Fried first.. 
TIP 1 : The oil should become spicier and that is what helps the entire curry to cook in spiciness.... This is very important Tip

Once cooked after approximately 1 minute, add Finely chopped onions
Now spread the onions across the entire Kadai and add salt sufficient to it..
You can do this on medium flame..

Now keep mixing these onions until they turn golden brown... Make sure that the onions are not boiled but fried... so you have to keep mixing.. If you keep the onions without mixing they will ooze out water and then they start boiling.. So keep mixing.. Until all the oil that is sucked oozes out.. This might take close 7-9minutes

Now add 1.5 TBSP of Wet Garam masala paste we made..mix it thoroughly with the onions .. Now fry it until all the Oil oozes out..

Now add 1 tsp of Chilli powder to this mixture...This will add Colour and taste
..

Transfer the chicken into the Kadai and mix it thoroughly very thoroughly so that all the pieces get evenly coated with the mixture ..


Don’t add any water.. this one should be on medium flame.. Keep mixing it..for 2 Minutes.... The Onions in the masala mix should be almost invisible and should be mixed up in the paste...

Once you kind of start seeing that, now close the lid and lower the flame to slight less medium .. Add very little water only if needed.. Like 1/2 cup or so.... Now Water  from Chicken also will start coming out of Chicken and Chicken should cook in its own stock only.. Just  mix slightly, the chicken every 3 minutes or so.. Should not let chicken stick to the bottom is our aim.. After 15 mins or so, check the chicken if you are able to cut with a spoon.. That’s when it is cooked and open the lid... 
Check the taste of the gravy now and see if additional Chilli Powder or Salt should be added..If you add chilli powder make sure that it is mixed and cooked otherwise the raw taste of chilli powder will bite you :).. Remember the chicken is already cooked so be gentle while mixing otherwise you will end up with shredded chicken..
Now add little water if needed for the consistency.. All the oil should float.. This probably takes another 10 minutes or so....


Chicken Curry Katam aur Abhi Khana Shuru Hojayee !!

Andhra Spicy Chicken Roast !!!


Andhra Spicy - Chicken Roast  (Can call it Chicken Fry too if you want :) )


Quintessential item in any Andhra Hotel..Andhra food is sometimes associated with spiciness..( Even if  you say most of the times, it doesn't surprise me)... Any non-veg loving person would like to have something that can be eaten any time and with anything... Like with just ghee rice, rasam rice, roti, chapatti, Rumali Roti, Biryani.. Absolutely with anything and everything....One of the best things that fits that requirement is Andhra Spicy Chicken Roast / Fry... Let's see how we can assure that craving is satisfied !!


For Marination

Around 1.25 kgs of Skinless Chicken cut you medium size

Clean it thoroughly and spread the chicken in wide basin or plate so that you can see each and every piece of chicken..

Now put salt so that every piece gets its share
Put Masala Kharam over every piece
Around 2 tbsp of Chillipowder..(non veg requires Spice)

Around 1 tsp of Jeera Powder(Don’t put too much)

Around 2 tbsp of Coriander powder

1 tbsp of Pepper Powder
2 tbsp of ginger Garlic Paste(make fresh one) better make it little coarse..(Unpeeled Garlic ).. This is for Texture

Put 2 medium size lemons... This is to break the meat and make it tender

Put 2 tsp of Oil...

Now mix everything thoroughly so that every piece gets coating
Oil is used for Binding

After you see the shine on each and every piece binding the entire masala we added..


Now add little curd(just 1 tbsp) and mix it thoroughly.. Curd is to break the meat and also make it tender.. The curd neutralizes the spice and sourness so add very little..It also helps in binding the masalas to the meat.. It should not make it watery.. Just little

Now mix it all again and ensure that every piece gets it share..

Now transfer it to a bowl or Dabba and seal it tightly.. Keep it in Fridge for 3-4 hrs or overnight...


Now for Masala Paste

3-4 Elaichi
10- Cloves (the more makes it spicier)
2 inch Cinnamon Sticks
2 inch Ginger
8 Garlic Cloves
10 - pepper corns
1 tbsp Cumin seeds
2 tbsp Coriander Seeds
2 tbsp poppy seeds (optional— this makes the paste little Kammaga.. So for now avoid it)
Little Dry Coconut— This adds amazing Flavour

Now transfer it to Mixie and make it a fine paste...

Keep adding very little water and grind it for 5 secs

Keep doing this process until it is fine paste


Preparation

Take 4-5 medium Sized onions and finely chop it...Very fine ..The gravy should be majorly based on onions and not water.. Also don’t put more because it makes it sweet

Take 9-10 Chillies Slit in Half

Take a thick Kadai.. It should be thick so as to retain the heat and let the meat cook with the conduction method...

Take out the marinated chicken from the fridge some 20 mins before the preparation..to make it come to room temperature

Now put it on High Flame.. Add 4-5 serving spoons oil.. Don’t worry on the oil as we can take it out later...

After the oil starts sputtering add the green Chillies.. Make sure the Green Chillies are cooked/Fried first.. The oil should become spicier...

Once cooked after approximately 1 minute, add Finely chopped onions
Now spread the onions across the entire Kadai and add salt sufficient to it..
You can do this on medium flame..

Now keep mixing these onions until they turn golden brown... Make sure that the onions are not boiled but fried... so you have to keep mixing.. If you keep the onions without mixing they will ooze out water and then they start boiling.. So keep mixing.. Until all the water that is sucked oozes out.. This might take close 7-9minutes

Now add 1.5 TBSP of Wet Garam masala paste we made..mix it thoroughly with the onions .. Now fry it until all the Oil oozes out..

Now add 1 tsp of Chilli powder to this mixture...This will add Colour and taste
..

Transfer the chicken into the Kadai and mix it thoroughly very thoroughly so that all the pieces get evenly coated with the mixture ..


Don’t add any water.. this one should be on medium flame.. Keep mixing it..for 2 Minutes.... The Onions in the masala mix should be almost invisible and should be mixed up in the paste...

Once you kind of start seeing that, now close the lid and lower the flame to slight less medium .. Add very little water.. Like 1/2 cup or so.... Now Water  from Chicken also will start coming out of Chicken and Chicken should cook in its own stock only.. Just  mix slightly the chicken every 3 minutes or so.. Should not let chicken stick to the bottom is our aim.. After 15 mins or so, check the chicken if you are able to cut with a spoon.. That’s when it is cooked and open the lid... Now add little water if needed for the consistency.. All the oil should float.. That’s Chicken Curry....For chicken fry take out the chicken pieces 1 minutes before the curry is done with very little gravy.. That’s when take out the Chicken pieces into a seperate Kadai.. The Kadai should be on high flame and complete hot...Take the oils from the chicken curry..(you can seperate oil from that).. Put oil and the chicken pieces.. Add Curry leaves and Cashew nuts ...Keep mixing the Chicken pieces thoroughly until all the water evaporates and sticks to chicken pieces.. Chicken Roast is done.. you can add some fried Chillies at the last.. ( Chillies fried in Chicken Curry oil:)


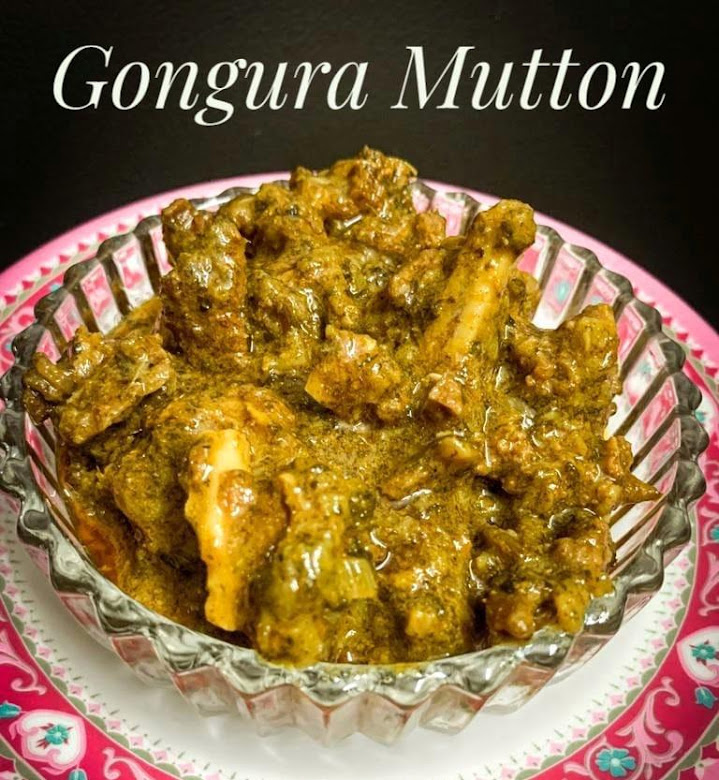
Gongura Mutton - Andhra Delicacy !!

Gongura Mutton 

If you have lived in Andhra and are a Mutton fan then you must definitely be a Gongura Mutton Fan... This dish is sure to please all mutton fans and one of those dishes which invigorates all your taste buds... Spicy, Tangy and everything :).. This is difficult to prepare, so be careful while preparing... But you can be rest assured you are going to succeed most of the times if you follow the recipe..


For Marination

Around 1/2 kg of Mutton Cut into medium pieces Shoulder / Leg meat preferably

Clean it very thoroughly and spread the Mutton in wide basin or plate so that you can see each and every piece of it

Now put salt so that every piece gets its share
Put Masala Kharam ( This is special karam which you will get in Kirana stores which comprises of lot of spices) .. It should be put over every piece
Next put Around 2 tbsp of Chillipowder..(non veg requires Spice)

2 tbsp of ginger Garlic Paste(make fresh one) ..

Put 2 medium size lemons... This is to break the meat and make it tender..
Put a spoon of meat tenderizer which you will get it in markets.. Or 2 tbsp of Raw papaya paste

Now mix everything thoroughly so that every piece gets coating

After you see the masala we added on every piece ,

Now transfer it to a bowl or Dabba and seal it tightly.. Keep it in Fridge for 1-2 hrs or overnight if you want it


Masala Paste

3-4 Elaichi
10- Cloves (the more makes it spicier)
2 inch Cinnamon Sticks
2 inch Ginger
8 Garlic Cloves
10 - pepper corns
1 tbsp Cumin seeds
2 tbsp Coriander Seeds
2 tbsp poppy seeds (optional— this makes the paste little less spicier.. So for now avoid it)

Now transfer it to Mixie and make it a fine paste...

Keep adding very little water and grind it for 5 secs

Keep doing this process until it is fine paste


Gongura Paste

Method to prepare Gongura Paste depends on the sourness of the leaves... Take lots of leaves, add some oil and salt and put them in kadai... In little low to medium flame... Keep Sauting, close the lid, let it cook in its own water... then Take off the lid and keep saluting and mixing until you get a thick paste...


Pre cooking


Take out the Mutton from the fridge atleast 1/2 hr before cooking
Take a wide pressure pan , put 2 tbsp of oil..
put the Mutton pieces in it and fry the Mutton pieces for 2 minutes.. ensure that all the Mutton is nicely coated with the oil..

After this Add 1.5 cups of water

Remember that there is lot of fat in the Mutton , so it will ooze out oil while boiling.. Mutton will not give out much water like chicken.. So be conscious of the water you are going to add.. You will use this stock later while cooking


Now boil the Mutton in Cooker for 2-3 whistles depending upon the tenderness of the Mutton.. I prefer 2 whistles and remaining slow cooking

After you stop the pressure pan, let it cool and separate out pieces and stock


Curry Preparation

Take 3-4 medium Sized onions and finely chop it...Very fine ..The gravy should be majorly based on onions and not water.. Also don’t put more because it makes it sweet

Take 9-10 Chillies Slit in Half

Take a thick Kadai.. It should be thick so as to retain the heat and let the meat cook with the conduction method...

Now put it on High Flame.. Add 3 serving spoons of oil.. Remember that there is lot of oil in the stock given out by Mutton

After the oil starts sputtering add the green Chillies.. Make sure the Green Chillies are cooked/Fried first.. The oil should become spicier...

Once cooked after approximately 1 minute, add Finely chopped onions
Now spread the onions across the entire Kadai and add salt sufficient to it..
You can do this on medium flame..

Now keep mixing these onions until they turn golden brown... Make sure that the onions are not boiled but fried... so you have to keep mixing.. If you keep the onions without mixing they will ooze out water and then they start boiling.. So keep mixing.. Until all the oil that is sucked oozes out.. This might take close to 7-9minutes

Now add 1.5 TBSP of Wet Garam masala paste we made..mix it thoroughly with the onions .. Now fry it until all the Oil oozes out..

Now add 1 tsp of Chilli powder to this mixture...This will add Colour and taste
..

Transfer the Mutton pieces into the Kadai and mix it thoroughly very thoroughly so that all the pieces get evenly coated with the mixture ..

Keep Frying for 4-5 minutes... Now add the stock which we took separately .. Let the Mutton pieces cook in slow flame with covered lid

Keep mixing it once in a while around every 4 -5 minutes or so...keep checking if Mutton is soft enough.. Once it is soft enough, take out the lid and increase the flame and bring it to the consistency you want.. This would probably take around 25-30 mins... Now add 2-3 Tbsp of Gongura Paste based on the tanginess you want...Mix it thoroughly so that all the mutton pieces are evenly coated...Since the Gongura Paste is separately cooked and Mutton also fully cooked, its matter of combining both the flavors... So, now cook them together for around 5 mins on medium flame or so...

All the oil should float..

Once done,  Your Yummy Gongura Mutton is ready to be served to your esteemed guests or eagerly waiting Family members... Remember that it is sometimes better to eat after resting it for 1 hr or so...!!


Chicken Pakoda - Perfect Snack for everything :)

Chicken Pakoda Recipe

Who doesn't like to munch on Chicken Pakoda given a chance...Ofcourse when someone prepares it and serves us , its brilliant... What if you want to eat the perfectly made one?  You need perfect Recipe for it ... Recipes which are tried and tested are the perfect ones.. So, here goes the one which when followed religiously is going to please you to the hilt


Take Boneless Breast - 250 gms cut into smaller cubes
Salt around - 1 tsp
Chilli Powder - 1 1/2 tsp 
Pepper Powder - 1/2 tsp 
Oil - 1 tsp
Ginger Garlic Paste - 1 tsp

Mix all of them thoroughly and let it sit for 2 hrs..

Next After 2 hrs
Add 1/2 egg beaten (Don’t add too much egg which makes it flowy as you will have to again compensate with Flour.. So just enough egg)
Add 
 Corn Flour - 2tsp
Maida - 1tsp
Kashmiri Lal Mirchi Powder -1 tsp for colour.. 

Mix them throughly.. 

The consistency should be thick.. with each piece coated with the mix lightly..

Now slit 10 Chillies into halves

Also take a spring of curry leaves

Take a Kadai with Oil to Fry.. 

The oil should be fully hot... First fry the Chillies and Curry leaves till they are crisp and keep them aside.. Frying the Chillies in the oil makes the oil spicy..This will be help while frying the Chicken..


Now put the chicken pieces in the oil such a way that entire Kadai is full of pieces.. This way pieces fry evenly.. Now slightly reduce the flame to Medium-High.. Keep Flipping the pieces intermittently until you get the desired colour and consistency.. Typically takes 3-4  minutes of deep frying as the pieces are slightly smaller cubes.. The pieces are done frying when you are able to cut the pieces with little spoon or ladle...


Next take them out.. Put all the pieces in a mixing bowl, add the freshly fried Chillies and Curry leaves, add little Garam masala and toss them..


You are definitely going to like your Chicken Pakoda !! Please do leave comments

Chicken Majestic - Truly Majestic

Chicken Majestic Recipe

Once you are in Hyderabad, you will never miss this ... Here goes the recipe


Take 500 gms of Boneless Chicken Breast

Cut them into thin strips… The strips should be of the size of Kurkure :) 

Salt them enough and then soak them in Buttermilk overnight…. Soaking in Buttermilk actually makes meat tender and makes the chicken retain more moisture

Next Day take out this Chicken 3 hrs before making 

After taking out, 

Add 1 egg
 2 TBSP Corn Flour
1 TBSP Oil,
1 teaspoon Maida
1 teaspoon Rice Flour
Make a paste of Ginger, Garlic and Green Chili and add 1 1/2 TBSP of it
1 teaspoon Pepper Powder
1 teaspoon Kashmiri Chilli Powder

Mix all of these along with Chicken… The chicken should be just coated enough absolute no water…

Now keep it aside for 2 hrs

Now heat the oil in a pan in medium heat… 

Tip :  To know whether the oil is hot enough , dip a back side of wooden ladle in the oil…
 1. Bubbles not coming , oil not hot enough
  1. After dipping if bubbles  are forming around the laddle, medium hot and good indication
  2. Bubbles shouldn’t come too fast.. It means Oil is really hot…Reduce the heat and let it cool down.

Just test it with one chicken strip and you will not…

If oil is less hot, the chicken will soak lot of oil… So, oil should be hot enough…


Put them in the batches… Don’t over crowd the oil kadai…

Usually since the chicken strips are thin , they will fry really fast… so max 2-3 minutes…

Fry and keep them aside…


Now finely shop around 25 Garlic Cloves

Slit 10 Green Chill in half

2 Large Spring of Curry leaves…


Take a pan, put around 1 1/2 tbsp of oil

Put Garlic Cloves, Green Chilli and Curry Leaves and sauté them

Put the heat on low and do following

Add 1/2 cup curd .. ( around 2 tbsp of Curd )

1 teaspoon coriander powder
1/2 teaspoon jeera powder
1/2 Handful of mint
1 tbsp Chilli Powder
Little salt.. just enough for the Curd added

Now put it in High Flame and thicken the curd and eventually it will disappear… 
Now add little Soya sauce and add the Chicken pieces…

Just add a pinch of Ajinomoto

And fry for mix for 2 minutes and switch off the flame…

Absolutely Delicious Chicken Majestic is Ready !!


Chicken 65 - Evergreen Favorite

Chicken 65 Recipe


We heard this name many times and we just can't believe how many stories are told around it... Everyone have their own versions of it... Here is our version of it...You sure have succeeded if everyone in your family enjoyed it to the core.. Do you also want to be a part of that joy... Then the wait is over!!


Take 500 gms of Boneless Chicken Breast

Cut them into  cubes…Approximately size of top part of  index finger :)


Add Salt, 
Finely Chopped Green Chillies
Finely Chopped Curry Leaves
1 TBSP Coriander Powder
1 tsp Jeera Powder ( Note its only 1 teaspoon)
1 tsp Pepper Powder
2 TBSP Masala Karam..( You will get Masala Karam in India) you can skip it if you don’t have it
2 TBSP Red Chilli powder
1 TBSP Ginger Garlic Paste
2 Teaspoons Kashmiri Red Chilli Powder…( 
1 TBSP Oil and mix it thoroughly

Now add 2 1/2 Heaped TBSP Corn Flour 
1 TBSP Maida
1/2 Teaspoon Baking Powder

Add little water to the mix so that it get coated 


Mix and Coat it thoroughly The chicken should be just coated enough absolute no watery kind… Check for the coating of Corn Flour… It should kind of cover the chicken just enough… No part of chicken should be visible.

Now keep it aside for 2 hrs

Now heat the oil in a pan in medium heat… 

You know the tip if Oil is hot enough or not right ;)


Put them in the batches… Don’t over crowd the oil kadai..

Deep Fry on Medium Heat only and cook only 70% ( 2.5 minutes).. Remove them and keep them aside.


Let them cool down a bit… Once all the chicken pieces are done… Now start 2nd round of frying.. 

Take very little number of pieces in each batch… Approximately 75% of 1st Round batches….

Deep Fry chicken pieces on High heat and alongside put Slit Green Chillies and Curry leaves…. Chicken should fry along with Green Chillies and Curry leaves..


Remember this entire thing should be done on high heat and keep mixing it thoroughly… after 1.5 minutes or so… Take them aside… 

For little punch, you can add very ittle garam masala and toss the chicken pieces..(This is optional)

Your Favorite Chicken 65 is ready !!!

LinkWithin

Related Posts Plugin for WordPress, Blogger...